DIY Basket Refresh

For the last six months I have searched for a basket trunk that could contain the ever growing toy collection that my sons’  have. We had an old metal trunk that was great looking, but not so great on little fingers if it were to fall on them. My son knew the rule: only an adult can get toys from the metal trunk. I was starting to feel a little paranoid, however, when my oldest son had friends over because I didn’t want anyone to get hurt. So, I scoured the internet looking for a large enough basket that had the style I like and had a lid light enough that if slammed shut, would not hurt any kiddos.

To my surprise, I couldn’t find anything.

I searched the big retail stores: Pottery Barn, West Elm, Crate and Barrel, Ikea.

Nothing.

Then I searched thrift stores, Craigslist.

Nothing.

One night this last Summer, my little family decided to take a walk around the block to get some fresh air and to my surprise this was on the curb, ready for trash day:

IMG_9869

The basket trunk of my dreams! (ok, well sorta, but who would have thought I would find it on the curb?! Life is funny.)

The homeowner was sitting on his porch when we walked by, so I quietly asked him if the trunk was trash (just to make sure). He said, “Yes.” They were purging at his house and if we wanted it we should take it home.

Well, okie dokie, thank you sir. We did. 🙂

As you can see in the picture, it was a little worn. I remembered a blog post a few years ago about how to refresh your baskets using this:

IMG_9874

So, I gave it a try and was pleasantly surprised.

IMG_9879

IMG_9875

Now that I look at this photo, I realize I’ve missed a few spots. I’ve been a little sleep deprived lately, so projects happen quickly. (if you follow me on Instagram, you’ve notice a new little human was added to our life. More on that next time.) 🙂

xo,
Kelly

diy Christmas cards {without using photoshop}

this was our first year not getting professional pictures done.

to save a buck (and because i like a challenge), i attempted to be our own photographer. i googled “how to use my timer on my rebel Canon” and went for it.

surprisingly, it wasn’t that hard. of course, they aren’t professional, but they’re good enough.

IMG_4776

first, i did a little research on Pinterest to check out family pictures and layouts of the people.

then, i picked a location (in this case it was at my grandmother’s house because she has a lot of fun props).

after that, i had my family choose clothing in a combination of blues and greens with different textures (plaid, striped, floral).

one Sunday afternoon, we all met up at my Grandmother’s place and my dad got the car in position, while i got everyone else in position and then set up my camera on a ladder, set the timer, ran and smiled.

okay, it wasn’t that easy, but almost.

two hours later, we were done. i went home to see what we came up with.

this is what they looked like:

IMG_4350

and here’s the one in my grandmother’s avocado grove:

Kelly_edited copy

besides being a little blurry and a little washed out, we were happy.

the next step was to add some words. since my computer (a MacBook Air, the smallest version) does not have enough memory (or gigabits or whatever…that’s my brother, the computer guy’s, arena), i like to use a program called Picasa. it’s completely free and allows you to completely edit photos and add text and overlays (B&W, antique, sepia, etc) to any photo. you can’t switch out heads (that sounds so morbid, sorry) or cut pieces of the picture out like Photoshop; it’s not that advanced. i have loved it, regardless, and it’s super easy to work with.

here’s what the pictures looked like after adding words:

IMG_4333

and the back:

IMG_4373 copy 4

the last step was to make them into cards.

i uploaded the photos into an online company called Mpix that i’ve been using for the last few years for our cards and any prints i need. they are an online professional photography lab and each card and print is looked over and double checked by an actual individual. plus, the cards are printed on the highest quality of paper. you can choose different textures such as linen, pearl (a beautiful metallic finish) or 100% recycled paper AND it’s all included in the price of the card. we went with the postcard style card (envelopes are included) and opted to pay a small fee to have the corners rounded. i highly recommend this company. i’ve done some price comparisons and they are more affordable than some of the other top leading card companies (tiny prints, minted, etc).

so, there you have it. the basics on how to diy on your Christmas cards.

IMG_4773

pretty easy, huh?

IMG_4435

as long as everyone cooperates. 😉

xo

diy refinish furniture {for only $2}

i love the rustic, farmhouse look.

but not when it’s on a piece of furniture that is neither rustic nor farmhouse.

IMG_3986

my son so lovingly decided to help distress this piece of furniture in our dining room when he found a screwdriver that was accidentally left out.

IMG_3982

it’s inevitably going to happen when a three-year-old is in the house.

IMG_3985

a couple of years ago, i remember thinking i was going to have to probably sand down and refinish this entire dresser and the task seemed a bit overwhelming.

then i stumbled upon a pin on Pinterest about refinishing furniture with a couple of simple household items. i tried it and couldn’t believe my eyes!

i thought i would share this (probably not so secret) advice.

IMG_4003

here’s what you’ll need: 1.) white vinegar 2.) olive oil

seriously, that simple! i bought each from the dollar store and came home and did half and half in a bowl and then used a soft cloth to wipe the concoction on (a little goes a long way!).

this is what the dresser looks like now:

IMG_4007

what a difference, eh?

IMG_4011

the shine will last for about six months and then it’s time to re-oil it again.

IMG_4013

so, before you take that old beat up piece of furniture to the refinisher….grab yourself some oil and vinegar and give your furniture some love.

it’ll shine and say thank you!

diy burlap pillow cover

i remember when i was about seven and i gave my grandmother the cutest little green heart chotchkie you ever did see.

(side note: can we please pause on the word chotchkie. is it not the strangest yet most fun word to say? say it three times fast, chotchkie, chotchkie, chotchkie. wasn’t that fun? did i lose you? i had to google it to figure out how to spell it correctly and this is what google told me: a small worthless piece of crap. well, gee thanks, google. it did redeem itself by adding a side note. how fun that google also likes to use side notes. no wonder we are friends. anyway, google also said in its side note: chotchkies can be pretty. indeed some are. and some are, unfortunately, worthless pieces of crap.)

well, my grandmother loved her new little green heart and she decided, at the time, to hang it in her bathroom. the only problem was that her bathroom was not green. it was peach. with absolutely no green in sight.

this new no-green-in-the-peach-bathroom sparked a redecorating frenzy and my grandmother was soon replacing all of her rugs and towels and such to make the cutest little green heart chotchkie look like it belonged.

i’ll never forget my grandfather giving me a half smile and telling me that he was really glad i gave her that cute little green heart. his words, if i remember correctly, were, “ya know you start with a green heart and before you know it, everything else must be changed.”

you might be wondering why on earth i am telling you this story?

well, besides the obvious, that i really wanted to use the word chotchkie in a sentence, i also recently experienced how one little chotchkie can spark a snowball decorating frenzy.

enter my cute little owl i received from the garland exchange i signed up for.

IMG_3769

isn’t he cute?

you know what’s not cute?

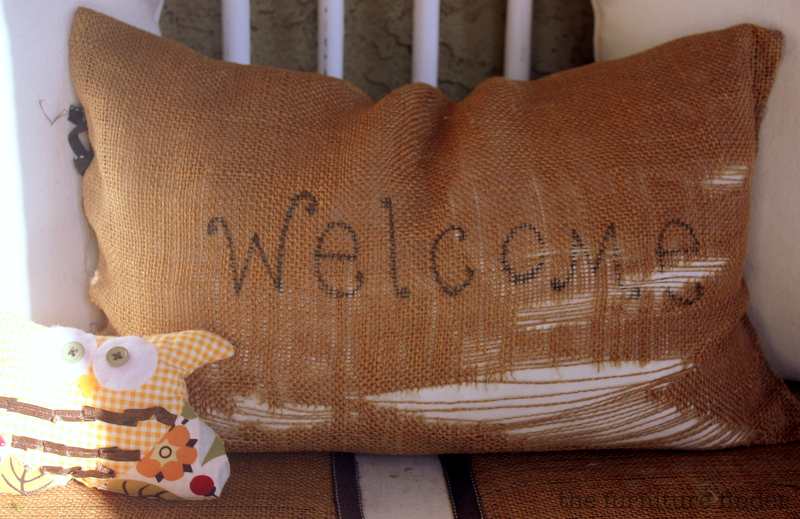
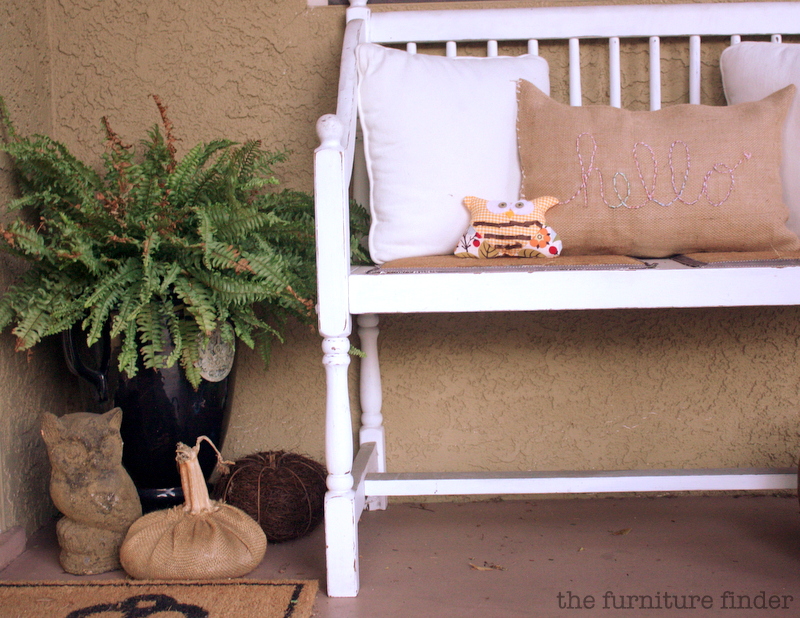
yup. that welcome burlap pillow that sits on our front porch bench. not so welcoming, if you ask me.

it was time for some redecorating.

IMG_3772

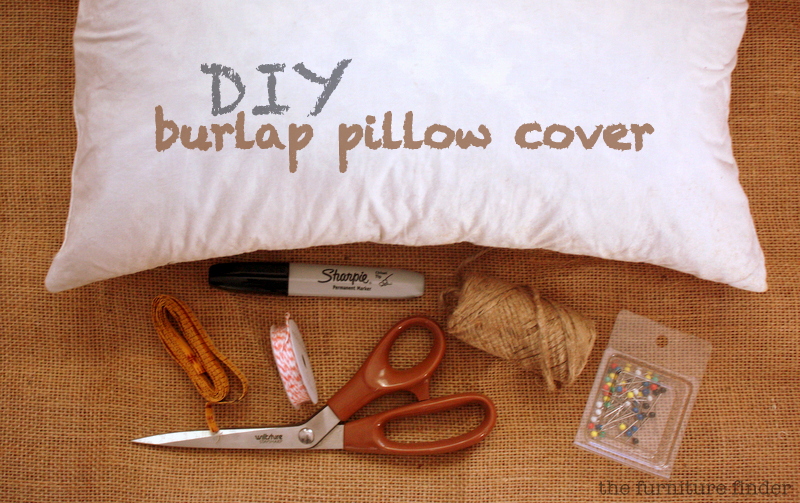
so, i grabbed some supplies: a sharpie pen, scissors, bakers twine, pins, brown twine (that i decided not to use and instead use white thick string), measuring tape, and of course, burlap. oh and a large sewing needle (i forgot to add it for the picture).

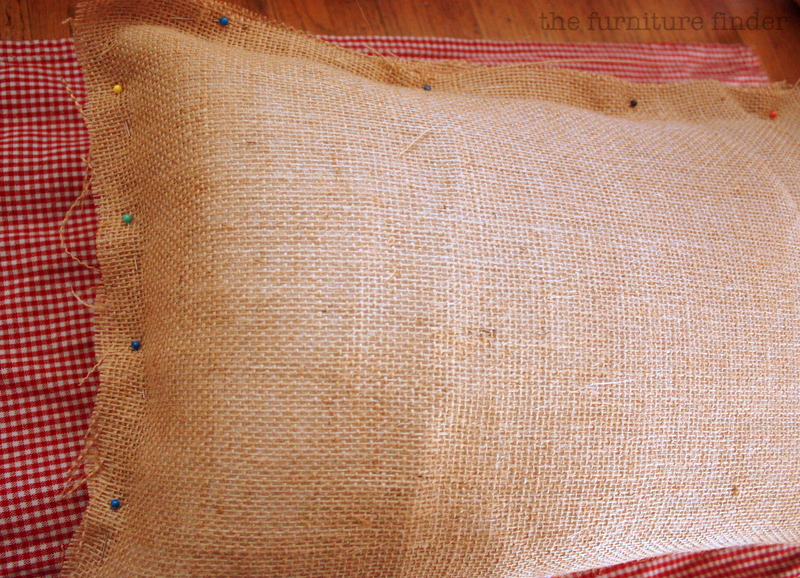
i started by wrapping my pillow insert in the burlap (if you’re wanting it to be more precise, use the measuring tape…i like to wing it).

IMG_3775

then pin the edges together, so you’ll know where to sew.

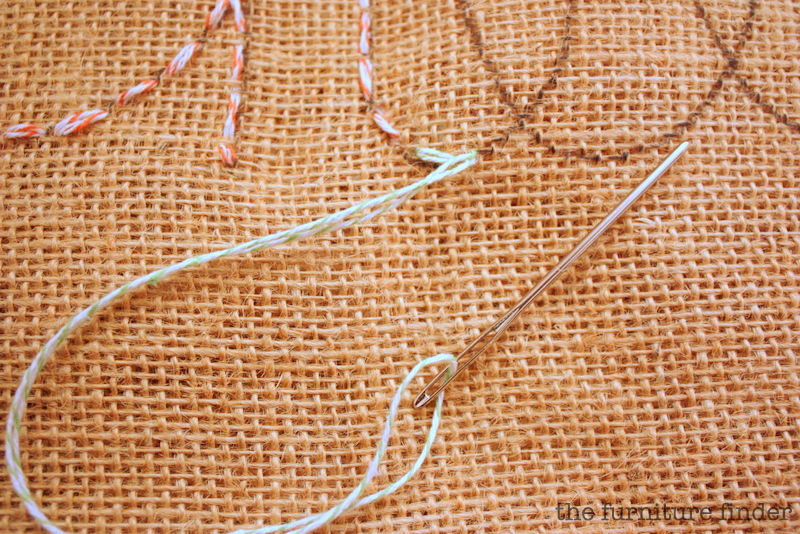
this is where i stopped taking pictures because i wasn’t so sure how it was going to turn out. just take your needle and string and weave in and out around the edge until two thirds of the sides are sewn. are you following that? i’m terrible at tutorials.

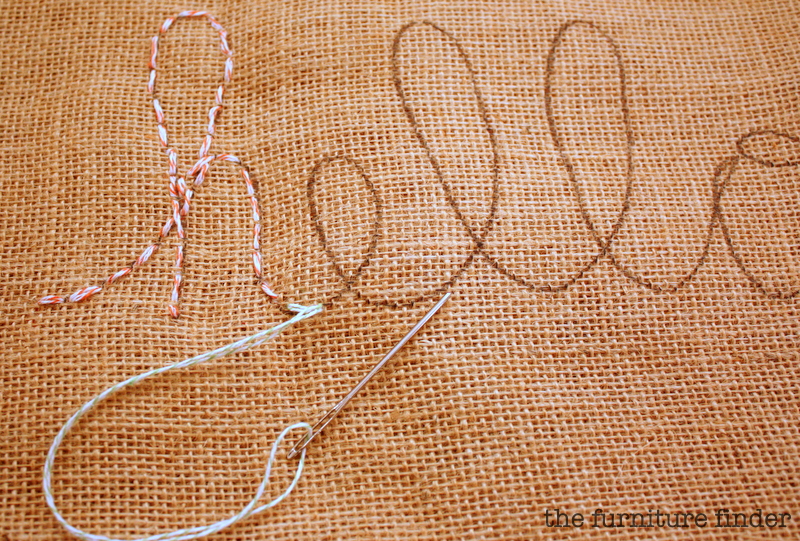
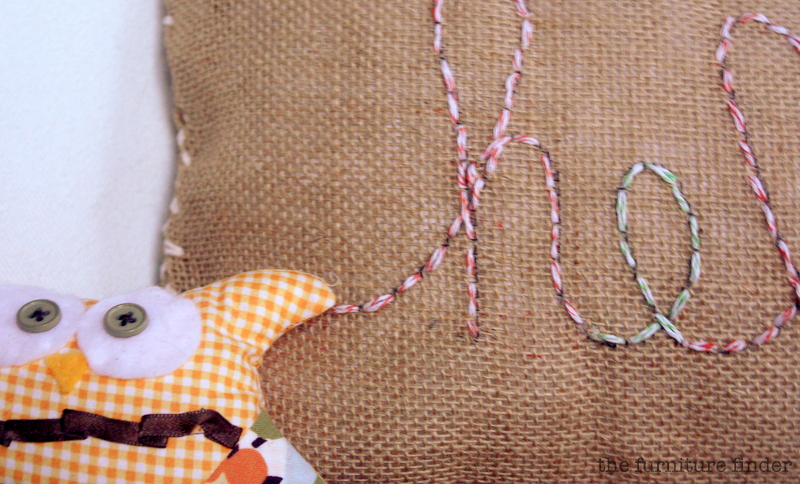
next, take the sharpie and write your word or saying onto the burlap.

IMG_3777

then take the bakers twine and sew along the letters (after you’ve removed the pillow insert).

IMG_3778

you could also cross-stitch to make it more interesting, but i only had an hour free during my son’s nap time, so i had to work fast.

IMG_3781

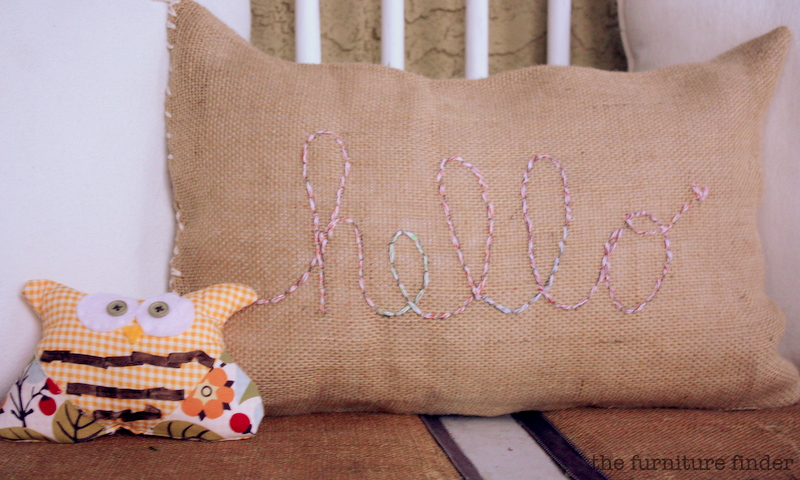
once that’s done, slip your pillow insert in and tuck the last edge inward and sew together and you’re done.

IMG_3783

put it next to the cute little owl that started it all and stand back and admire.

IMG_3784

and then notice that your thrifted two dollar pillows need pom pom edging and your front porch bench needs to be reupholstered.

Ah, yes, this is what my grandfather must have been talking about when he said, “start with one thing and everything must be changed.”

i guess i have some projects lined up for the next couple of weeks.

that’s okay. i’m loving my pretty little worthless pieces of crap. i mean chotchkies. 😉

chotchkie, chotchkie, chotchkie! such a fun, strange word! 😉

Instagram

diy: backyard chalkboard

remember the vintage sale i had a couple months ago?

IMG_3161

well, i had a few things left over that didn’t sell and one of the items was this old door.

IMG_3159

i was kinda glad it didn’t sell because i really liked it and thought it would be fun for something.

a few weeks ago, i was trying to convince my son to play in the backyard with me. he didn’t really want to and i can’t blame him. it’s hot, the grass is very dead, and there’s not a whole lot to do.

so, to tempt him in trying to play in the backyard, i made him this:

IMG_3635

i think i might add some clips, so he can also use it as an easel and paint once in awhile.

IMG_3638

it makes for the perfect spot to score our baseball games (mini baseball games that is. our backyard is tiny).

IMG_3633

he was pretty excited about it for about a day and a half. he has now moved on. *sigh*

time to think of a new attraction for the backyard. i’ve got some ideas brewing.

happy Monday, friends. here’s to a new week ahead!

antler dream catcher

i can’t believe i actually have antlers in my house.

i’m sure there was a day that if you told me i would want antlers on my wall, i would have given you a raised eyebrow.

well, sometimes i fall into the trends (i resisted the chevron pattern, so i’m feeling okay about the antlers). 😉

i scored some antlers at the Long Beach Flea a few months back and  decided to paint them and make them into a dream catcher for my son’s room.

IMG_3377

first I taped off the tips and painted them gold and then painted the rest of the antlers white. then i got a wood slice from Michaels to mount it and finished it off with a piece of burlap.

IMG_3378

once that was completed, we sat down as a family (well, my son didn’t really sit down….more like did hand stands in our big chair) and we talked about what our dreams are for him.

we have many dreams for him: to see the world, to be happy, to be purposeful in what he does,

IMG_3383

to be a caring person, and most importantly, a man of God.

IMG_3379

our boy would throw out some dreams every so often: go on an airplane, or a helicopter, be a policeman.

IMG_3380

one dream  of his that is huge (and verging obsessive) is to be a fireman, so that was added to his dream catcher.

IMG_3375

it was a fun little project and i’m sure we’ll be adding more dreams on as time goes by.

IMG_3394

hope all your dreams come true, sweet boy. mommy and daddy love you tons! xo

diy: under bed storage

is it just me or do toys seem to reproduce in the night?

seriously, i go to bed with a semi-clean house and wake up and there are legos and toy cars and puzzle pieces everywhere! i am constantly rearranging/reorganizing toys to better fit them into our small space.

when i made this project, i didn’t actually have my son’s room in mind. i was just thinking it would be a cool thing to sell at my vintage sale.

IMG_3205

well, i had a few lookers, but it didn’t sell and i’m kind of glad because it fits perfect in my boy’s room.

IMG_3202

here it is before:

IMG_3156

i cleaned the inside and out and then painted the front with Annie Sloan Chalk Paint ‘Old White’ because that’s what i had on hand. then i add some black and white wrapping paper to the inside and some casters to the bottom from our garage that were left over from a diy gone bad. considering, i got this piece from a free pile from a neighbor’s yard sale (it was pulled out of an old craftsman in the neighborhood), and i only bought the wrapping paper, i think it cost me a total of $5. not too shabby! although i might go back and change the knobs….someday.

IMG_3194

it fits perfect and my son has all of his favorite toys right at his level.

IMG_3190

which means he can also help me clean them up. (hee hee) 😉

have a blessed week friends!

xo

diy: artwork

i made some art the other day for our laundry room.

IMG_3215

it’s simple and really does not warrant a tutorial (think ball point pen and a piece of paper).

i was inspired by the artwork in my new friend’s house.

plus, i had a couple of old frames on hand that my grandma gave me in my late teens. these silly frames have traveled with me through countless moves. i’m so glad they finally have a home and a cute lil message in them.

(before)

IMG_3135

it’s not perfect. in fact, i think i forgot to dot an i. whoops. oh well. i like it and it works and the quote inspires me.

(after)

IMG_3212

so, there you have it.

see you all tomorrow for the upstairs tour of the big yellow/big green house!

transformation thursday: diy cork board & recovered trunk

remember this beauty?

IMG_1504

it now looks like this…

IMG_2895

a good friend of mine just got married this last weekend and i got to transform this beauty into a cork board for their seating chart. the wedding was at a beautiful location in the hills of Brea, California. the decor was based around a classic vintage theme (think 1920’s glamour), so this frame fit perfect. i wish i had more pictures from the wedding and the after picture of the seating chart, but my camera died (bum!).

i now get the pleasure of using it as a jewelry cork board.

and incase, you are interested in making one of your own, here’s a supplies list that you’ll need:

IMG_2759

1. cork
2. scissors
3. frog tape (to secure the cork board to the existing chalkboard. you could also glue it down, but i like the option of being able to convert it back to a chalkboard, if i change my mind. which, will probably happen because, well, that’s what i do). 😉
4. staple gun
5. fabric

directions: since i don’t have step-by-step instructions (diy fail) I’ll do my best to walk ya through it. just take the existing chalkboard, cut the cork to the size of the chalkboard, tape the cork to the board around the edges, lay the board flat on top of the fabric and pull the fabric tight as you staple gun it around the back, then pop it into your frame. you’re done. i think if i were to do it again, i might add two layers of cork to have a deeper cushion to push pins into. instead, i just pushed the pins down into the cork, not straight back (hopefully, that makes sense?).

another little fun re-do i got to do for the wedding was my old trunk (actually, it’s my husband’s from his childhood, but what’s that old saying….what’s yours is mine, what’s mine is mine?). 😉

here’s the before (with a little frog tape because i am an impatient diyer):

IMG_2764

it was a little rough inside. i liked it, but it was way more rustic then what they were going for at the wedding. so, the beautiful bride and i got to go shopping for fabric and we found this gorgeous deep blue velvet (the couple’s colors for the wedding were colbalt blue with touches of gold…let me tell you, i was in Heaven because those are my favorite!). then i just used frog tape to put on top of the old paper inside and used a hot glue gun to attach the fabric into place.

and now the after:

IMG_2882

the mr&mrs. used it on the welcoming table to collect gifts and cards as guests arrived.

i looooove it! it was a little more time consuming than i had thought, but well worth it! i had originally thought i would take the velvet off after the wedding was done, but i like it so much i think i’ll keep it on! in fact, a funny story (or funny to us) about this trunk is that the bride’s brother (who i grew up across the street from) came up to me and said, “i like your chest.” um. thanks? he was quite embarrassed when his wife informed him that it was called a, “trunk.” HA! it became a good laugh for the rest of the evening and we might still be laughing about it. it’s okay, M, i like my chest, too! 😉

hope you all had a fabulous thursday!

diy: removable wallpaper

lets talk about my kitchen for a sec.

it.is.ugly.

okay, not that bad, but it definitely is not my favorite room in our house. it’s small (with not a lot of counter space), no dishwasher (except we recently purchased a portable one that we can roll over to the sink…a pain, but better than nothing), and it has the ugliest wood paneling you ever did see (sometimes visitors tell me they think it’s quaint. and then i mention that we should add it in their kitchen and then they agree: it’s ugly).

(before diy: removable wallpaper was added)

IMG_2421

also, i don’t think i mentioned this before, but we are renting our little old house, so the wood paneling has to stay. ugh. to remedy my eyes from the burning glow of orangey wood paneling, i came up with a plan to disguise it temporarily.

it now looks like this:

(after diy: removable wallpaper was added)

IMG_2699

the idea for this wallpaper came from this blogger (i’m probably going to mention her a lot….it’s one of my constant reads in blogland). she painted her design on her walls, but since i’m renting and painting was not an option, i came up with a plan for a removable wallpaper.

here’s how i did it.

IMG_2680

supplies: contact paper, scissors, pen or pencil, exact-o knife (forgot to add it for the pic, oops), and a design stencil. i got mine here.

step 1: trace design

IMG_2690

step 2: cut out design

IMG_2692

step 3: stick design to wall

IMG_2694

it’s that easy.

it’s not perfect, but i’m okay with that. once you step back, the design takes over and each little imperfection is masked (or at least i tell myself that).

you might want to start your design in the middle of the wall and then just work your way out.

IMG_2693

eventually, your design will start to appear on the wall.

IMG_2696

it doesn’t take very long. maybe an hour to trace, cut and stick a wall this size:

IMG_2427

and the best part, is that it’s removable. so, when you are ready for a change, or move out, just peel each piece off and you’re done! your landlord will never know!

i’m sure there are a zillion different patterns and colors of contact paper you could use.

hope it inspires you to get creative and have fun!